I’ve done a fair bit more work on the Warhound, so brace yourselves, the tsunami of pictures is coming!


First up were the ‘arms’. Or cannons. Or whatever the things on the side of the Warhound are, but I’m going with weapons. I opted to make a Plasma Blastgun and a Turbolaser, but obviously they are magnetised with washers so I can make more weapons in the future.
My original plan was to actually have proper arms, complete with claw fingers, which is what the Start Collecting: Skittarii boxes were for, but unfortunately the Dunecrawler legs were a tad too small. Which is strange, considering I had worked with them before when making my Bloodslaughterer conversion so I thought I had a good idea of the scale of them. Oh well, guess they’ll just have to be turned into more Daemon Engines then, and it would have driven me crazy that despite having claws the Warhound only has one attack.


I had the main ‘core’ blu tacked together, but I didn’t want to commit to gluing it together until I was sure of how the head was going to attach onto it. So that was the next order of business, and responsible for a small mental breakdown on Saturday, since it just wouldn’t go together how I had envisioned. One nap later I had gotten over my obsession with using Maulerfiend parts and got most of the head done. I am actually quite proud of it, my favourite part being that I actually managed to fit in the pilot! Naturally the head plate is magnetised, so I can take it off whenever I need (which will probably only be when I show people that there is an interior).


For those following my Tumblr, you’ll recognise these pictures! As is evident by the pins gracefully sticking through the roof, the head isn’t permanently glued in yet, since I was waiting for the next stage…


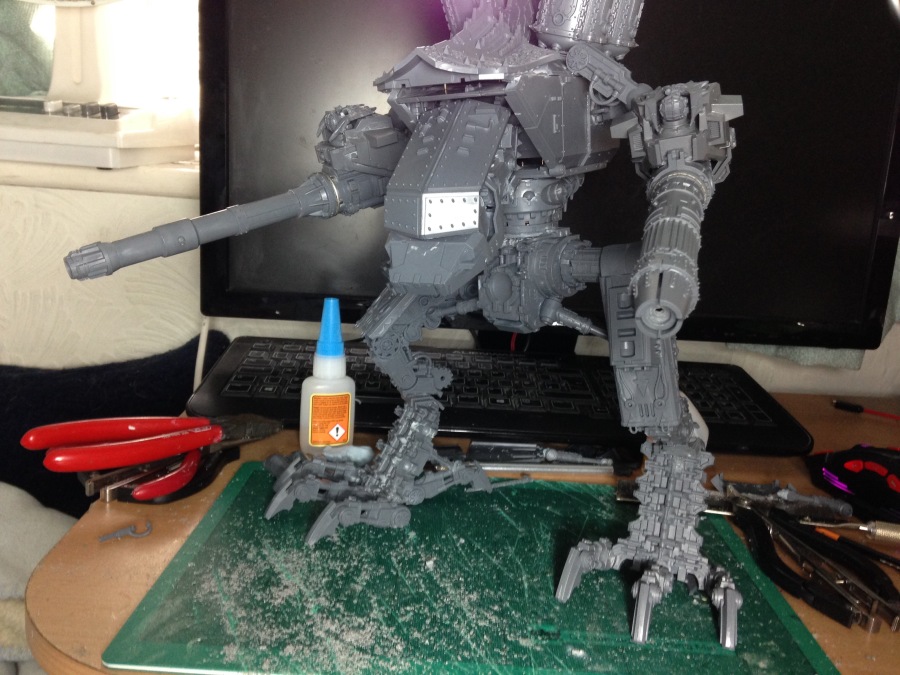
The ‘first draft’ of the model! The head is drooping a little since she decided to fall about several times at the waist when I was holding her, so the friction isn’t as great anymore. Shouldn’t be a problem when it’s glued though. The tanks at the top are glued either, since the spines running down the back will be impossible to paint if they are there.
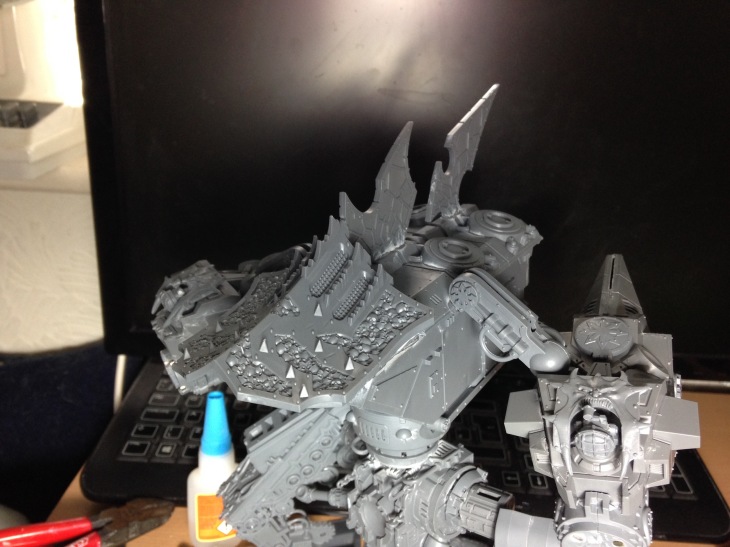
Here’s a closer look at the spines and the ‘naked’ Warhound. From the moment I first got my hands on the Heldrake kit 3 years ago I wanted to use those bits to give a model Godzilla style spines, but unfortunately I couldn’t find a big enough model. Maybe that’s the real reason why I started this project…

There you have it, the first build of the Chaos Warhound! That was basically the result of my entire weekend, so I doubt I’ll have much time to work on it for awhile. The next stage is armouring and cabling (surprised that that was an actual word). Be sure to check out my Tumblr at renegade-girl-blog for more sporadic updates on whatever I’m working on. I will be going on holiday soon, but I think I might build a true scale Dark Apostle at some point in the near future, so look forward to that! Thanks for attending Antagonists Anonymous!

I’m in awe. Great work on the titan. It really looks the part.
LikeLike
Thank you!
LikeLike
That is excellent! I’ve got a huge amount of respect for anyone that takes on a conversion as large and complex as this, and pulls it off. Plus the fact that it serves Chaos automatically wins it extra points from me 😉 Nice work!
LikeLike
Thank you!
LikeLiked by 1 person
This is an awe-inspiring kitbash indeed! The sheer scope of the project is amazing, but you’ve also managed to come up with an almost perfectly recognisable War Hound. If I have one complaint, it’s that the head/face area seems a little too bland and not nearly chaotic and vicious enough. On a related note, have you ever seen Biohazard’s Gorehound conversion? It’s fairly similar in many ways, and yet I think you could both take lots and lots of inspiration from each other’s models.
Keep up the amazing work!
LikeLike
Yeah the Gorehound is incredible! And I would agree, the head is the least finished area, so hopefully I can find some time to give her a bit of a makeover in the near future!
LikeLiked by 1 person